Showing posts with label workflow. Show all posts

Wednesday, May 3, 2017

Workflow Charting for Textbook Authors

Whether drafting a first edition or revising a textbook, it's a big, complex undertaking. 

It's not easy to keep track of all the many tasks, most repeated in a particular sequence for each chapter and section. These steps of the writing-revising process can add up to hundreds of individual tasks that could be easily overlooked without efficient tracking.

The video below briefly outlines the method that has worked well for me. 

Making check marks on a workflow progress chart make me happy. I hope you'll find happiness the same way!

Please download the handout before watching the video.


Click here for the video (if you don't see the player below).

Wednesday, April 19, 2017

Lion Tamers Guide to Writing Textbooks

This summer, I'll be presenting A Lion Tamers Guide to Writing Textbooks: High Performance with Minimal Injury at the Textbook & Academic Authoring Conference in Providence RI.

In the brief video below, I give my loyal readers a preview of that presentation, as well as a "bonus" preview of a second offering that I'm co-presenting at the conference.

Lion Tamers Guide to Textbook Authoring PREVIEW from Kevin Patton on Vimeo.

Click here if the video player isn't visible above. 


Want to know more?

  • June 9-10, 2017
  • Providence RI
  • Note: Be sure to get there in time for the informal reception on the evening of June 8!

Wednesday, September 28, 2016

Writing and Developing Your College Textbook: A Comprehensive Guide

The title of this book says it all, it truly is as comprehensive a guide to getting a textbook project off the ground (and keeping it going) as one could imagine.

Honestly, I had some reservations about the Textbook & Academic Authors Association (TAA) jumping with both feet into publishing books themselves. But this is the second book I’ve seen come out of that effort and both are outstanding in their usefulness and their instructional design. I’m a believer now, TAA!

(See my previous review of Guide to Textbook Publishing Contracts.)

As a book of 320 pages, one is always concerned about whether it’s just too big to be very useful for a busy academic. Nothing to worry about, there!

First, the book is thoughtfully “chunked” into parts, chapter, sections, and subsections—making both reading and “raiding” the book easily accomplished. You can learn more about “the art of chunking” on p. 164.

Second, the internal design features many lists, tables, samples, graphics, and sidebars that organize the information visually. We all know that this helps any user find information and build a conceptual framework for how it all fits together.

Most importantly, perhaps, is that the text narrative is written in a direct, conversational style that tells the story of what’s involved in developing your own textbook. It’s like having a team of mentors sitting on your shelf, ready to give advice whenever you need it.

When I hear about a new guide or manual, I want to know who created it. Is it someone who can reliably be a virtual mentor to me? For this guide, we have three main authors who exceed usual expectations in that regard:

  • Mary Ellen Lepionka has done it all: professor, author, editor, publisher. 
  • Sean Wakely brings his wide and deep editorial and textbook development expertise. 
  • Steve Gillen is a former publishing attorney who has been in private practice representing textbook authors for decades. 
I’ve experienced and benefited from the work of all three for a long time, so I’m not surprised that their collaboration has produced such a useful guide.

Besides the main authors, the guide is sprinkled with brief “Author to Author” essays written by textbook authors whose long experience ranges widely in discipline, publishers, types of textbooks, and personal style of authorship. They tell stories that clarify how textbook authorship isn’t simply something “on the side” of your main career, but is a profession unto itself—one that has all the intricacies, jargon, customs, and pitfalls of any professional endeavor.  In short, they tell you why you need this guide!

Of course, no guide like this can tell you everything, but I can’t find any important topic that isn’t considered (at some level) in its pages. And I really tried to find one!

I wish I’d had such a helpful and thorough guide when I started working on textbooks thirty years ago. But I’m glad to have it now. It will help me keep up to date on current trends in my profession—and get advice on specific topics from trusted colleagues.


I looked at a pre-publication copy for this review, but you can download a free 17-page sample by visiting this page at TAA's website:


Fill out the form in the pop-up window, or click the circular "download" button on the page.

Wednesday, December 2, 2015

Bulk Rename Utility Saves Time and Improves Work Flow

In this digital age, all those skills we learned about organizing paper files are now being used to manage digital files. And textbook authors have a LOT of digital files to organize, including

  • Chapter drafts (previous edition, first draft, revised draft, copyedited draft, etc.)
  • Page proofs (first round, first round with author comments, second round, etc.)
  • Reviews
  • Research articles and other resources
  • Correspondence

I find that besides organizing such files into disk folders with descriptive names and nested in a logical manner that makes them easy to find, the filename of each file is critically important. When I have such files open on my desktop screen or attached to an email or located in a publisher's file management platform, I'm not always clear on what file version I'm really looking at. However, if I'm careful to use filenames that tell me this information, I have less of a concern.

At the beginning of a new revision process, I usually get files from the previous edition to use as the starting point. The individual chapter files often have some esoteric name that means something to the folks that created these files—but not necessarily very meaningful to me. For example, there may be as many as four extra leading zeroes. I guess that's to allow for books that have hundreds or thousands of chapters. Sometimes these filenames include the ISBN number of the previous edition of the book. Like that's going to help me.

I usually go in and change the names of all those chapter files to something more helpful to me as I progress through the revision process. For example, I'll include the chapter number. But I only need one leading zero before the single-digit chapter numbers. That goes first, to make the file list in the folder easy to navigate.

By the way, if you forget to use leading zeroes, then chapter 2 will be listed after chapter 19 and chapter 3 will be listed after chapter 29. Leading zeroes put them where they belong.

I also add in a shorthand telling me the title and edition number I'm working on. So Structure & Function of the Body 15th edition becomes SF15e and Anatomy & Physiology 9th edition becomes AP9e.

Then I append something that tells me what version I'm dealing with. For example, draft1 or copyedit or pages1. If these are versions that contain my responses to copyediting, then I'll also append my initials or name, such as kp or kpatton

I usually separate each of these shorthand units with a hyphen to make them easier to read at a glance. For example, 03-AP9e-copyedit-kpatton is the version that has my responses to the copyedited version of chapter three for Anatomy & Physiology 9th edition.

This seems like an awful lot of drone work, doesn't it? I agree that it would be if I typed in these filename changes in the usual way. But I don't. It literally takes me a few seconds to change the filenames of all 48 chapter files—plus several files for the glossary, front/back matter, appendices, etc. How can that be, you ask? I use a handy, cost-free tool called Bulk Rename Utility.

Whenever you open Bulk Rename Utility, you'll see this screen:


As the online tutorial advises, "The first thing to do is DO NOT PANIC!" It goes on to advise the user who has just picked themselves up off the floor that you don't really have to use all the controls available in the dashboard. Basic functionality—even advanced functionality—is really much simpler than it may seem with this complex screen that to me resembles the dashboard of one of those huge airliners.

You don't believe me. You think this is way over your head—something only your 11-year-old computer-gaming nephew will be able to handle. Because I know this, I've provided this video that proves how unbelievably simple it is for even we of The Beverly Hillbillies generation can handle.


If you want a video that also walks you through the installation process (and shows you how to rename image files) then click here Renaming Files Using Bulk Rename Utility.

For more tips like this one, come to my workshop Strategies to Make Your Textbook Workflow More Efficient at the 2016 TAA Conference.


Monday, October 12, 2015

Occupational Hazard for Authors: Sitting

Over the last decade, there has been growing wave of scientific reports that shows us that what we've always feared to be true is now a proven fact—being an author can kill you!  Or at least can increase your risk of death.

There are probably many such risks associated with the writer's life, such as paper cuts that get infected, the stress of deadlines that adversely affect blood pressure, a set of Oxford English Dictionaries (OEDs) falling on our heads, and glare from our monitors that give us the insomnia that raises our risk of heart attacks. But the issue I want to address today is probably the worst of them all: prolonged sitting.

Most of us sit at a desk when we are doing our secretive and lonely job of writing and revising.  For hours and hours, for days and days, month after month.  And any time we are sitting, we are not doing any significant physical activity.  We know by experience it can cause neck and back pain and loss of muscle mass and bone density. Researchers also find that such sedentary behavior can increase our risk of diabetes, cardiovascular disease, cancer, and other life-threatening chronic conditions. In fact, just prolonged sitting—regardless of other physical activity level—can increase these health risks.

So what, if anything, can we do to save ourselves?  Besides giving up our passion of writing?

I'm sure that more studies are coming soon that will help us choose the very best strategies for our predicament.  In the mean time, I have some suggestions:

  • Don't sit so much. Duh-uh. But how can we do what we do without sitting?  A lot? I suggest doing some of those tasks while standing up! Stand-up desks, and stand-up extenders for sitting desks, are becoming popular and easy to find. I've not found a good stand-up desk setup for my writing studio yet, but I have found that using an extender on a work table allows me to many of my writing tasks standing up.  The more of tasks I can find that could be done standing up, the less the risks to my health will be.

  • Get up and move around more. Okay, this is just a corollary to "don't sit so much."  But I've made a conscious effort to get up out of my chair more often to get things (like a volume of that deadly OED I mentioned), take a short walk over to the aquarium to watch the fish (or maybe even scrape a bit of algae off the glass), or just step outside for a moment to catch a breath of fresh air (and perhaps refill the bird feeder).

  • Add some activity to the daily routine.  Yeah, it's just a corollary to the other corollary to "don't sit so much."  But really, intentionally adding more physical activity to your day can counteract at least a bit of that deadly sitting effect.  Here are some ways I've found to add such activity without having to <groan> take up jogging—and without taking away much time from my writing.

    • Walk up the stairs and back down every once in a while, just to get some steps in.

    • Get a Fitbit or other type of pedometer, so you can see if you really are adding activity to your day.

    • Build a daily walk or two into your routine.  I've begun taking my dog for a loop around the block after lunch and after dinner most days.

    • Make "moving" choices.  When running errands, I now park in the back corner of the lot, so I have to walk more to get where I'm going. I take the stairs instead of the elevator.  Unless my appointment is on the 19th floor.

  • Practice Tai Chi.  Yes, it's a corollary to the corollary "add some activity."  But this one deserves its own special mention. That's because I just finished reading some studies on the health benefits of Tai Chi and found out that it's phenomenal for reducing the same health risks caused by too much sitting—and provides additional wellness benefits.

    Although I enjoy hiking, biking, and even a few short resistance (weight) workouts each week, I really don't find anything enjoyable about other "exercise for the sake of exercise" activities such as treadmills, stationary bikes, ski contraptions, or rowing machines.  But Tai Chi?  I look forward to my daily half-hour of Tai Chi practice.  I find it way more relaxing, easy, and fun than yoga, exercise videos or classes, or anything else I've tried.

    Tai Chi is something I can do in smaller bits
    when I want to.  I can get up and do a quick 5 minutes of Tai Chi and then sit back down to that dreaded glossary I've been working on.  Not only does it add activity (and get me out of the chair), it also clears my mind and reduces stress so that I can "embrace" the glossary.  Well, maybe not that last thing.

Enough said.  You get the point.  If we want to reduce the serious occupational hazards of being an author (not the silly ones I mentioned before) by sitting too much, there are some steps we can take that don't require huge changes to our days—or to our productivity.

Want to know more?  Check out The health hazards of sitting.

Top photo: Dora Mitsonia
Bottom photo: Diana


Tuesday, January 17, 2012

Reading a copyedited manuscript

I just ran a across a recent article about how how to decipher the "redline" copy an author receives from a copy editor.  If you're not used to the process, it can be quite confusing at first glance.

The article by Carol Saller does a great job of introducing the basics.  Although I've been dealing with such redlines for many years, the article a few tips that I found useful.  So whether you're new at the game or a seasoned author, I recommend:
Deciphering a Redlined Manuscript
Carol Saller
Lingua Franca (The Chronicle of Higher Education). 16 Jan 2012.  Accessed 17 Jan 2012.
http://my-ap.us/zuJ7eL
Tip: You can follow Lingua Franca, a blog about language and writing in academe, by clicking the "subscribe" link at the bottom of the right column next to any article in the blog.

Friday, January 6, 2012

Children and authoring

(c) Kevin Patton
With four major textbooks in regular need of revision, plus countless ancillary materials, I spend a lot of time working in my home office.  And I have a 7-year-old.

Like many work-at-home parents, I struggle with the tug-of-war that happens when my boy and I want to play at a moment when I really need to be working.  Of course, 7-year-old boys are not very good at understanding deadlines . . . or the concept of "just let me finish this one task and I'll be with you."

One idea that helps give me a few extra minutes to finish up an urgent task before playtime has been to invite my boy to engage in his own writing project!

I have a spot in my office designated as "Luke's desk" . . . it's just one end of a work table where I often sketch out art concepts for my textbooks and manuals.  He's always been attracted to the piles of blank paper just screaming to be drawn upon with all the colorful pencils overflowing the "pencil basket."  And who can resist all the funky rulers and stencils that are piled next to the colored pencils?

When Luke asks me to play with him, and I can't do it right away, I ask him if he wants to "work on a book, too."  Sometimes he just draws some things on a few pieces of paper and I finish my task and off we go to play.  However, when my task takes a little longer, he's managed to produce a "book." 

In the photo, he's showing off one of his books, titled "All the Planits in the solr stem!" . . . his version of "All the Planets in the Solar System!"  It's just a few pages of circles of various sizes and colors, each labeled with a planet's name.  I helped him staple the edges and his book was complete.


Of course, I try to stop and play with my boy when he asks.  But sometimes, I really need just a few more minutes of work time, so I don't lose track of the threads I'm weaving together.  And this method lets me do it in a way that still satisfies his (and my) desire to do something "together" . . . until we get to some full-throttle Lego time.

By giving him his own workspace in my office, I think he feels less like it's a Daddy-only space. So the office becomes a less "separating" space.  And he loves the satisfaction of creating drawings and lists  . . . and entire books!


Have you found other ways to balance kid activities and home-office tasks?  Let's hear about them!

Tuesday, March 15, 2011

Expand your view!

No matter if your writing project is bit or small, you'll benefit by having more than one monitor.

After hearing about another textbook author who had a two-monitor setup several years ago, I couldn't believe that such a setup would have any benefits . . . other than taking up too much desktop space.  But the image of such a setup lingered in my imagination for many months, and I began thinking of all kinds of reasons how a 2-monitor spread could my life a lot easier.

For example, I could actually SEE the various windows that I often keep open while writing or revising a set of chapters:
  • Chapter file window - main text I am working
  • Glossary file window (to update as I add new terms or change old terms)
  • End of chapter window (to update as I revise the main text)
  • Browser window (for research)
Imagining that such a setup would be prohibitively expensive and overly complicated to install, I decided to actually investigate the possibilities.  I was pleasantly surprised to find that it was CHEAP and EASY!

Because most computers have built-in graphics cards that already have connectors for two monitors, I found that all I needed was another monitor. And these days good quality monitors are relatively inexpensive. So all I had to do was get another monitor and plug it in!

The hardest part — and it wasn't very hard – was tweaking the settings for the display in the control panel of my computer. But guess what? Windows (and I assume the Mac OS) already anticipates the use of multiple monitors, so it's a matter of selecting from choices that are already programmed into the system.  It was a snap.

It really only takes a few minutes — believe it or not!

After a couple of years of using two monitors, I decided to add a third monitor. This took a little more effort — but not much. I purchased a second graphics card, selecting a relatively inexpensive one from an online vendor. That gave me two additional connectors for monitors. I did have to open up my computer case and install a graphics card, but that's a lot simpler than it sounds. Then I simply plugged in my third monitor, reset the display settings in the control panel, and I was good to go.
 
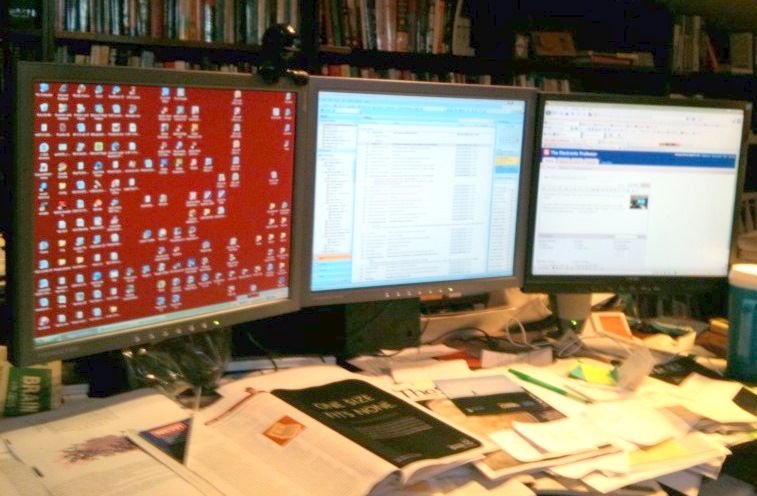
Click here to see my original 3-monitor setup, with standard 19" LCD monitors set up in landscape orientation.

I've considered using a fourth monitor but I think I would be overwhelmed. Research in this area backs up my own experience, which says that two or three monitors provides just the right amount of  space  for efficient work.

Right now I'm using three widescreen LED monitors that are tilted 90° into portrait mode. You can see in the photos that this provides a nice layout for writing. (Click any photo to enlarge it)

You can guess that I'm glad I went in this direction. Or I wouldn't have continued to expand and improve my set up. And if I didn't like it, this whole article would have a much different tone!

In fact I strongly recommend that you get at least two monitors!

Having multiple monitors really does increase your efficiency and reduce the frustration that you might feel when you're working in several windows at the same time but can't see all of them. The time saved in being able to simply drag-and-drop or copy and paste without opening and closing windows is itself worth adding a monitor.

Once you have tried a multiple monitor setup, you'll never go back!

When getting a monitor, you may want to consider an LED backlit monitor because this type of monitor is VERY energy/cost efficient and is far less bulky than other types of monitors.  Also, be sure that you get a monitor that can swivel if you want to use them in portrait orientation.  Another option is to use a special stand to support multiple monitors.

For additional commentary on this topic, see my article Why you need more than one monitor in The Electronic Professor.